Chapter 9. 영상 인식(ImageRecognition)
1절. 영상 인식(Image Recognition)
2절. 가중치 저장 및 복원
3절. 전이 학습
1절. 영상 인식(Image Recognition)
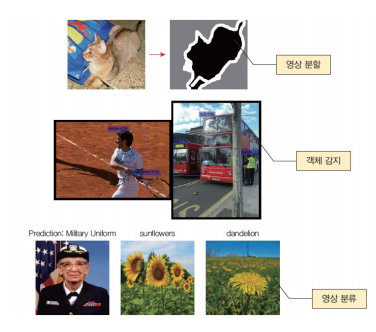
컨볼루션 신경망(CNN)
- 영상 안의 물체를 인식하거나 분류
- 생물체의 영상 처리 구조로부터 모델 학습
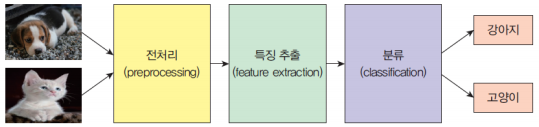
전통적 영상 인식 시스템 구조
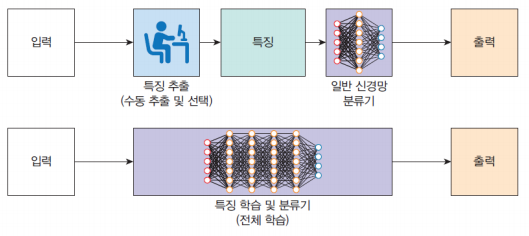
심층 신경망을 이용한 영상 인식 과정
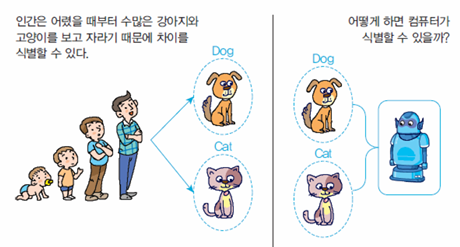
영상 인식
- 영상 인식에 가장 많이 사용되는 신경망 : 컨볼루션 신경망(Convolution Neural Network)
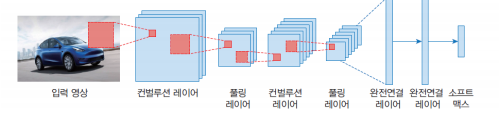
구조

- 특징 추출기(컨볼루션 신경망)
- 특징 분류기(완전 연결 신경망)
예시
데이터 증대(Data augmentation)
- 한정된 데이터에서 여러 가지로 변형된 데이터를 만들어내는 기법
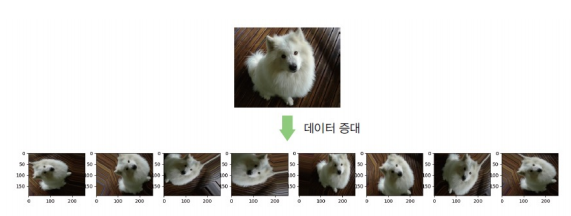
ImageDataGenerator()
- 파이썬의 제네레이터 형식
- 영상 생성 제네레이터 객체 생성
- next()가 호출되면 변형 영상 표시
# 라이브러리 포함
import tensorflow as tf
import matplotlib.pyplot as plt
from numpy import expand_dims
from tensorflow.keras.preprocessing.image import load_img, img_to_array

image = load_img("dog.jpg")
array = img_to_array(image)
sample = expand_dims(array, axis=0)

# 영상 변형 정의
from tensorflow.keras.preprocessing.image import ImageDataGenerator

datagen = ImageDataGenerator(rescale = 1./255,
                             rotation_range = 90,
                             # 회전 한도
                             brightness_range = [0.8, 1.0],
                             # 밝기 변형 비율
                             width_shift_range = 0.2,
                             # 좌우 이동 한도
                             zoom_range = [0.8, 1.2],
                             # 확대 한도
                             height_shift_range = 0.2)

# 변형 영상 표시
obj = datagen.flow(sample, batch_size=1)
fig = plt.figure(figsize=(20,5))

for i in range(8):
  plt.subplot(1,8,i+1)
  image = obj.next()
  plt.imshow(image[0])

2절. 가중치 저장 및 복원
가중치
- 이미 학습된 모델의 가중치 저장 가능
- 필요 시 가중치를 불러와 신경망 예측 가능
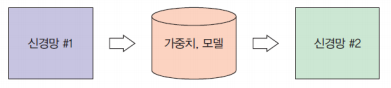
저장
-
저장 정보
-
신경망 모델의 아키텍처 및 구성
- 훈련 중 학습된 모델의 가중치 값
- 신경망 모델 컴파일 정보
-
옵티마이저와 현재 상태(훈련을 중단한 곳에서 재시작)
-
저장 형식
- TensorFlow SavedModel 형식
- 이전 Keras H5 형식
복원
예제
import numpyas np
import tensorflowas tf

# 난수의 훈련 예제
test_input= np.random.random((128, 32))
test_target= np.random.random((128, 1))

# 입력 == 32, 출력 == 1 노드인 신경망 모델 구축(함수형 API 사용)
inputs = tf.keras.Input(shape=(32,))
outputs = tf.keras.layers.Dense(1)(inputs)
model = tf.keras.Model(inputs, outputs)
model.compile(optimizer = "adam", loss = "mean_squared_error")

# 신경망 3번 훈련
model.fit(test_input, test_target, epochs = 3)

# 모델 저장
model.save("my_model")

# 저장된 모델 불러오기
saved_model = tf.keras.models.load_model("my_model")

# 저장된 모델 재학습
saved_model.fit(test_input, test_target, epochs = 3)

# 출력
# ...
# Epoch 3/3
# 4/4 [==============================] -0s 505us/step -loss: 0.4354
3절. 전이 학습(Transfer Learning)
전이 학습(TL)
- 사전 학습된 신경망 모델을 다른 용도로 사용하는 것
- 하나의 문제에 대해 학습한 신경망의 모델과 가중치를 새로운 문제에 적용
- 특징과 분류를 묶어서 학습
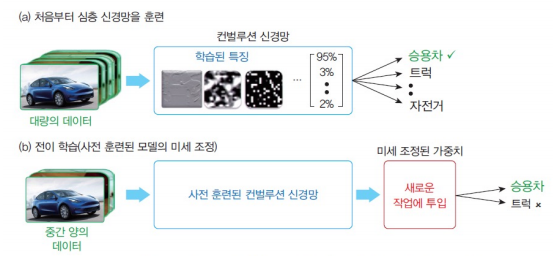
사전 훈련 신경망 모델
종류
- 케라스 어플리케이션(Keras Applications)
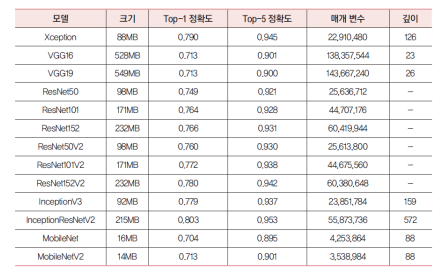
프로젝트 적용
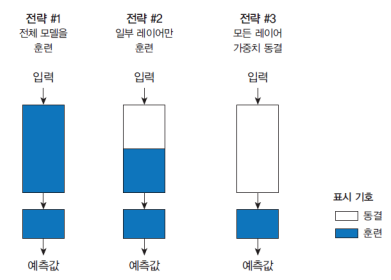
예제 1)
- ResNet50을 다운로드 받아 변경하지 않고 그대로 사용
- 인터넷에서 강아지 사진을 다운받아 올바르게 인식하는지 확인
from tensorflow.keras.applications.resnet50 import ResNet50
from tensorflow.keras.preprocessingimport image
from tensorflow.keras.applications.resnet50 import preprocess_input,
decode_predictions
import numpyas np

model = ResNet50(weights='imagenet')

img_path = 'dog.jpg'
img = image.load_img(img_path, target_size=(224, 224))
# 영상 크기 변경 후 적재

x = image.img_to_array(img)             # 넘파이 배열 변환
x = np.expand_dims(x, axis=0)           # 차원 1 증가 및 배치 크기 필요
x = preprocess_input(x)                 # ResNet50이 요구하는 전처리 진행

preds = model.predict(x)
print('예측:', decode_predictions(preds, top=3)[0])

# 출력
# 예측: [('n02111889', 'Samoyed', 0.9557966),
# ('n02114548', 'white_wolf', 0.01857086),
# ('n02112018', 'Pomeranian', 0.00947881)]
예제 2)
- 케라스가 제공하는 사전 훈련 모델 중 MobileNet로 분류기 레이어를 붙여 새 신경망을 생성
- 강아지와 고양이 영상으로 학습
import numpyas np
import matplotlib.pyplotas plt
from tensorflow.keras.layersimport Dense,GlobalAveragePooling2D
from tensorflow.keras.applicationsimport MobileNet
from tensorflow.keras.preprocessingimport image
from tensorflow.keras.applications.mobilenetimport preprocess_input
from tensorflow.keras.preprocessing.imageimport ImageDataGenerator
from tensorflow.keras.modelsimport Model
from tensorflow.keras.optimizersimport Adam

base_model=MobileNet(weights='imagenet',include_top=False)
# input과 output에 모델을 새로 추가

x = base_model.output
x = GlobalAveragePooling2D()(x)
x = Dense(1024,activation='relu')(x)
x = Dense(1024,activation='relu')(x)
x = Dense(512,activation='relu')(x)
preds = Dense(2,activation='softmax')(x)

model = Model(inputs=base_model.input,outputs=preds)
# 모델 input, output 추가 부분

for layer in model.layers[:20]:
  layer.trainable=False
for layer in model.layers[20:]:
  layer.trainable=True

train_datagen
= ImageDataGenerator(preprocessing_function = preprocess_input)

train_generator
= train_datagen.flow_from_directory('./Petimages/',
                                    target_size=(128,128),
                                    color_mode='rgb',
                                    batch_size=32,
                                    class_mode='categorical',
                                    shuffle=True)

model.compile(optimizer = 'Adam',loss='categorical_crossentropy',
              metrics=['accuracy'])

step_size_train=train_generator.n//train_generator.batch_size
model.fit_generator(generator = train_generator,
                    steps_per_epoch = step_size_train,
                    epochs = 5)

# 출력
# ...
# Epoch 5/5
# 68/68 [==============================] -29s 431ms/step
# - loss: 0.1646 - accuracy: 0.9470