Chapter 5. 다이얼로그와 알림
Chapter 5. 다이얼로그와 알림
‘깡샘의 안드로이드 앱 프로그래밍 with 코틀린’ 10장 학습 내용
1절. API 레벨 호환성 고려
API 레벨 호환성
- 최소 24 버전 기기에서 오류가 발생하지 않는 동작 필요
- minSdk보다 상위 버전에서 제공하는 API 호환성 고려
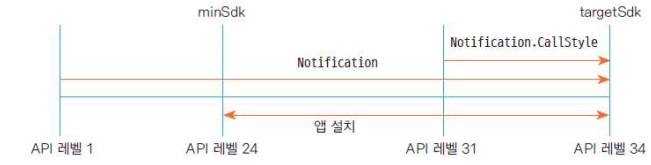
애너테이션 사용
- @RequiresApi · @TargetApi 애너테이션 이용
- 오류 무시 설정
@RequiresApi(Build.VERSION_CODES.S)
fun noti() {
  // (... 생략 ...)
  val builder: Notification.Builder = Notification.Builder(this, "1")
    .setStyle(
      Notification.CallStyle.forIncomingCall(caller, declineIntent, answerIntent)
    )
  // (... 생략 ...)
}
- API 레벨 호환성 문제 방지를 위한 코드 처리
// API 레벨 >= 30인 경우에 실행되는 addCallback() 함수

if(Build.VERSION.SDK_INT >= Build.VERSION_CODES.S){
  val builder: Notification.Builder = Notification.Builder(this, "1")
    .setStyle(
      Notification.CallStyle.forIncomingCall(caller, declineIntent, answerIntent)
    )
} else {
  // 이전 버전 그대로 처리 코드 필요
}
2절. Permission 설정
퍼미션 설정과 사용 설정
- A 앱 컴포넌트 => B 앱에서 사용
- A 앱 컴포넌트에 Permission 설정 => B 앱 연동에서 문제 발생
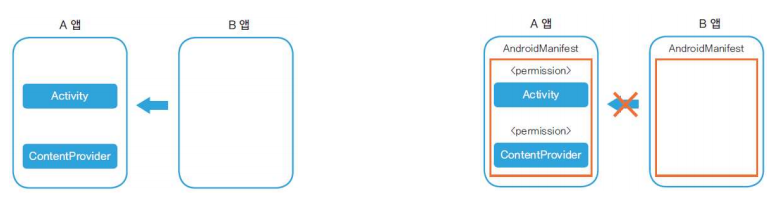
- <permission> 태그 : 기능을 보호하려는 앱 매니페스트(AndroidManifest.xml) 파일에 설정
- <uses-permission> 태그 : 퍼미션으로 보호된 기능을 사용하려는 앱 매니페스트(AndroidManifest.xml) 파일에 설정
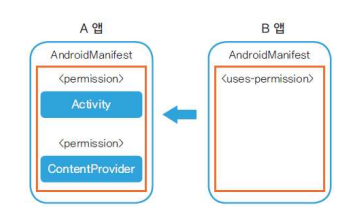
태그 · 속성
| 속성 | 설명 |
|---|---|
| name | permission 이름 |
| label · description | permission 설명 |
| protectionLevel | 보호 수준 |
Protection Level 속성값
- 보호 수준
| 종류 | 설명 |
|---|---|
| normal | 낮은 수준 보호 사용자에게 권한 허용 요청 X |
| dangerous | 높은 수준 보호 사용자에게 권한 허용 요청 필요 |
| signature | 같은 키로 인증한 앱만 실행 |
| signatureOrSystem | 안드로이드 시스템 앱 · 같은 키로 인증한 앱만 실행 |
1
2
3
4
5
6
<!-- 퍼미션 설정 -->

<permission android:name="com.example.permission.TEST_PERMISSION"
  android:label="Permission TESTING"
  android:description="@string/permission_desc"
  android:protectionLevel="dangerous" />
permission 설정 예시
- <uses-permission> 2개 설정
1
2
3
4
<!-- 퍼미션 사용 설정 : 안드로이드 표준 권한 -->

<uses-permission android:name="android.permission.ACCESS_NETWORK_STATE" />
<uses-permission android:name="android.permission.ACCESS_FINE_LOCATION" />
- <permission> 설정 후 보호할 컴포넌트에 적용
1
2
3
4
5
6
7
8
<!--컴포넌트에 퍼미션 적용-->

<activity android:name="OneActivity"
          android:permission="com.example.TEST_PERMISSION">
  <intent-filter>
    <action android:name="android.intent.action.PICK" />
  </intent-filter>
</activity>
- 컴포넌트 이용 AndroidManifest.xml에 <uses-permission> 선언
1
2
3
<!-- 퍼미션 사용 설정 -->

<uses-permission android:name="com.example.permission.TEST_PERMISSION" />
퍼미션 사용 설정 종류
| 종류 | 설명 |
|---|---|
| ACCESS_FINE_LOCATION | 위치 정보 접근 |
| ACCESS_NETWORK_STATE | 네트워크 정보 접근 |
| ACCESS_WIFI_STATE | 와이파이 네트워크 정보 접근 |
| BATTERY_STATS | 배터리 정보 접근 |
| BLUETOOTH | 블루투스 장치 연결 |
| BLUETOOTH_ADMIN | 블루투스 장치 검색 후 페어링 |
| CAMERA | 카메라 장치 접근 |
| INTERNET | 네트워크 연결 |
| READ_EXTERNAL_STORAGE | 외부 저장소 파일 읽기 |
| WRITE_EXTERNAL_STORAGE | 외부 저장소 파일 쓰기 |
| READ_PHONE_STATE | 전화기 정보 접근 |
| SEND_SMS | 문자 메시지 발신 |
| RECEIVE_SMS | 문자 메시지 수신 |
| RECEIVE_BOOT_COMPLETED | 부팅 완료 시 실행 |
| VIBRATE | 진동 |
퍼미션 허용 확인
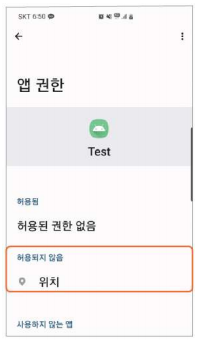
- API 레벨 23 버전부터 허가제
- <uses-permission> 선언 후 사용자 권한 화면에서 거부 가능
- 앱 실행 시 사용자 퍼미션 거부 여부 확인
- 거부한 경우 퍼미션 허용 재요청
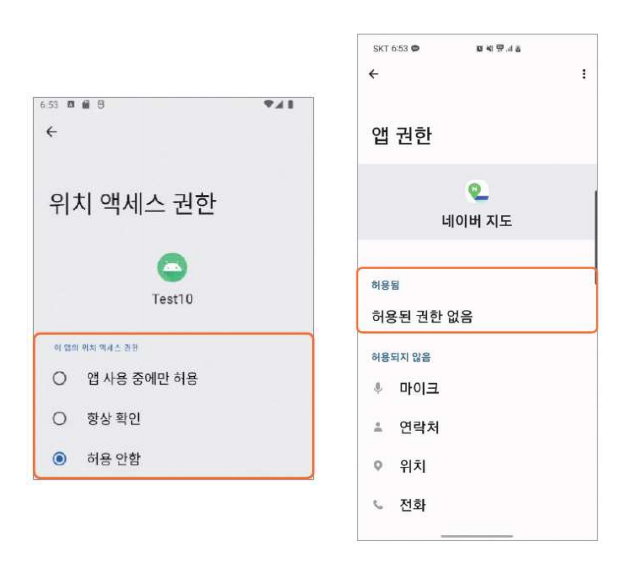
checkSelfPermission()
- permission 허용 여부 확인
- 결괏값 : 상수
| 함수 | 설명 |
|---|---|
| PackageManager.PERMISSION_GRANTED | 권한 허용 |
| PackageManager.PERMISSION_DENIED | 권한 거부 |
// 퍼미션 허용 확인 예시

val status = ContextCompat.checkSelfPermission(this,
            "android.permission.ACCESS_FINE_LOCATION")

if(status == PackageManager.PERMISSION_GRANTED) {
  log.d("Yunseo", "permission granted")
} else {
  log.d("Yunseo", "permission denied")
}
퍼미션 거부
- 거부한 상태인 경우
- 사용자에게 해당 퍼미션 허용 요청
ActivityResultLauncher 객체
- registerForActivityResult() 함수 호출 후 생성
- 첫 번째 매개변수 : 어떤 요청인지를 나타내는 ActivityResultContract 타입 객체
- 두 번째 매개변수 : 결과를 받았을 때 호출되는 콜백
- launch() 함수 호출 후 요청 실행
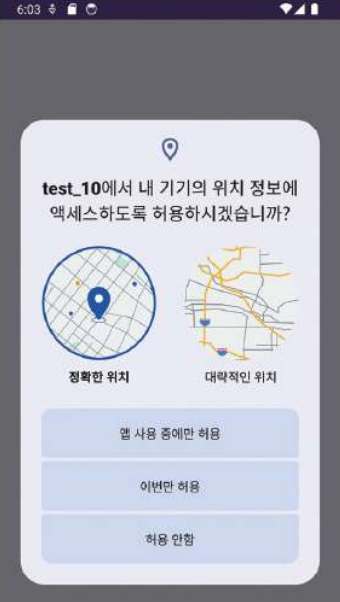
// 퍼미션 허용 요청 확인

val requestPermissionLauncher = registerForActivityResult(
ActivityResultContracts.RequestPermission()
) { isGranted ->
  if(isGranted) {
    Log.d("Yunseo", "callback, granted...")
  }
  else {
    Log.d("Yunseo", "callback, denied...")
  }
}
// 퍼미션 허용 요청 실행

requestPermissionLauncher.launch("android.permission.ACCESS_FINE_LOCATION")
3절. 다양한 다이얼로그
토스트 메시지
- 일시적으로 보여지고 사라지는 문자열
- makeText() 함수
// 기본 makeText() 함수
open static fun makeText(context: Context!, text: CharSequence!, duration: Int): Toast!

// 구간(duration)이 설정된 makeText() 함수
open static fun makeText(context: Context!, resId: Int, duration: Int): Toast!
- 세 번째 매개변수
- 구간(duration)
- 토스트가 화면에 출력되는 시간
| 코드 | 구분 |
|---|---|
| val LENGTH_LONG: Int | 길게 출력 |
| val LENGTH_SHORT: Int | 짧게 출력 |
// 토스트 출력 예시

val toast = Toast.makeText(this, "종료하려면 한 번 더 누르세요", Toast.LENGTH_SHORT)
toast.show()
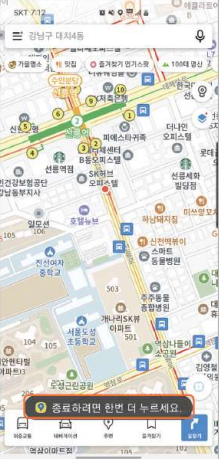
토스트 로직
- 토스트가 화면에 보여진 후 사라지는 순간을 콜백으로 감지
- 특정 로직 수행
- 콜백 기능 : API 레벨 30버전
// 콜백 기능

@RequiresApi(Build.VERSION_CODES.R)
// API 레벨 호환성 애너테이션

fun showToast(){
  val toast = Toast.makeText(this, "종료하려면 한 번 더 누르세요", Toast.LENGTH_SHORT)
  toast.addCallback(
    object : Toast.Callback(){
      override fun onToastHidden() {
        super.onToastHidden()
        Log.d("yunseo", "toast hidden")
      }

      override fun onToastShown() {
        super.onToastShown()
        Log.d("yunseo", "toast shown")
      }
    })
  toast.show()
}
날짜 · 시간 입력받기
- DatePickerDialog : 날짜 입력
- 사용자가 설정한 날짜를 콜백 함수로 반환
// 데이트 피커 다이얼로그 : 날짜

DatePickerDialog(this, object: DatePickerDialog.OnDateSetListener{
  override fun onDateSet(p0: DatePicker?, p1: Int, p2: Int, p3: Int){
    Log.d("yunseo", "year : $p1, month : ${p2 + 1}, dayOfMonth : $p3")
  }
}, 2024, 4, 6).show()
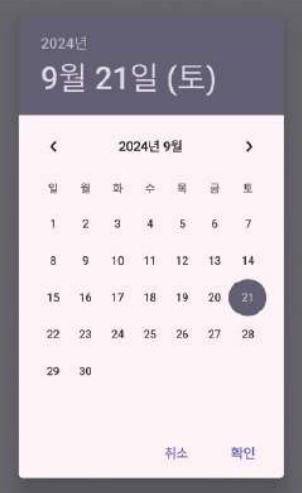
시간 입력받기
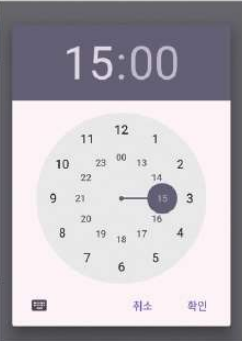
- TimerPickerDialog : 시간 입력
- 사용자가 설정한 시간을 콜백 함수로 반환
// 타임 피커 다이얼로그 사용 : 시간

TimePickerDialog(this, object: TimePickerDialog.OnTimeSetListener{
  override fun onTimeSet(p0: TimePicker?, p1: Int, p2: Int){
    Log.d("yunseo", "time : $p1, minute : $p2")
  }
}, 15, 0, true).show()
알림 창 띄우기
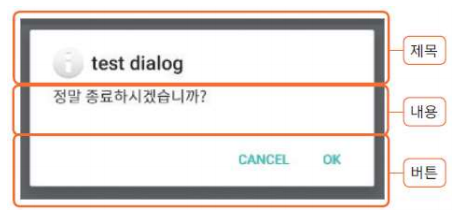
- 다이얼로그의 기본 : AlertDialog
- AlertDialog.Builder로 알림 창 생성
| 구성요소 |
|---|
| 제목 |
| 내용 |
| 버튼 |
// 아이콘 설정 빌더
open fun setIcon(iconId: Int): AlertDialog.Builder!

// 제목 설정 빌더
open fun setTitle(title: CharSequence!): AlertDialog.Builder!

// 내용 설정 빌더
open fun setMessage(message: CharSequence!): AlertDialog.Builder!
- 알림 창 버튼 지정 함수
// 알림 긍정(허용) 버튼 설정 빌더
open fun setPositiveButton(text: CharSequence!, listener: DialogInterface.OnClickListener!):
 AlertDialog.Builder!

// 알림 부정(거부) 버튼 설정 빌더
open fun setNegativeButton(text: CharSequence!, listener: DialogInterface.OnClickListener!):
 AlertDialog.Builder!

// 중립 역할(더 많은 정보 표현) 버튼 설정 빌더
open fun setNeutralButton(text: CharSequence!, listener: DialogInterface.OnClickListener!):
 AlertDialog.Builder!
- 알림 창 예시
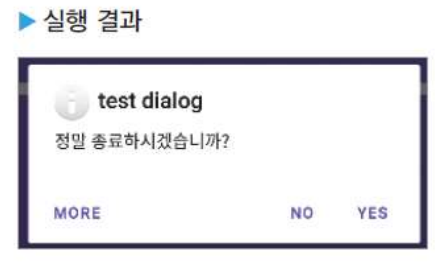
// 알림 창 띄우기

AlertDialog.Builder(this).run {
  setTitle("Test Dialog")
  setIcon(android.R.drawable.ic_dialog_info)
  setMessage("정말 종료하시겠습니까?")
  // setPositiveButton("Okay", null)
  // setNegativeButton("Cancel", null)
  setNeutralButton("MORE", null)
  setPositiveButton("YES", null)
  setNegativeButton("NO", null)
  show()
}
// 버튼 이벤트 핸들러 설정

val eventHandler = object : DialogInterface.OnClickListener {
  override fun onClick(p0: DialogInterface?, p1: Int)  {
    if(p1 == DialogInterface.BUTTON_POSITIVE){
      Log.d("Yunseo", "Positive button was clicked!")
    } else if(p1 == DialogInterface.BUTTON_NEGATIVE){
      Log.d("Yunseo", "Negative button was clicked!")
    }
  }
}

// 사용 예시
setPositiveButton("OK", eventHandler)
setNegativeButton("Cancel", eventHandler)
알림 선택하기
- 목록 제공 후 하나를 선택받는 알림 창 설정
| 함수 종류 | 요약 |
|---|---|
| setItems() | 알림 선택 |
| setMultiChoiceItems() | 알림 다중 선택 |
| setSingleChoiceItems() | 알림 단일 선택 |
// 알림 단일 선택 함수
open fun setItems(items: Array<CharSequence!>!, listener: DialogInterface.OnClickListener!)
: AlertDialog.Builder!

// 알림 다중 선택 함수
open fun setMultiChoiceItems(items: Array<CharSequence!>!, checkedItems: BooleanArray!, listener:
DialogInterface.OnMultiChoiceClickListener!)
: AlertDialog.Builder!

// 알림 단일 선택 함수
open fun setSingleChoiceItems(items: Array<CharSequence!>!, checkedItem: Int,
listener: DialogInterface.OnClickListener!)
: AlertDialog.Builder!
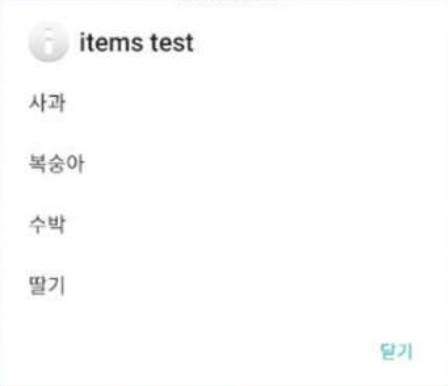
// 목록 출력 알림 창

val items = arrayOf<String>("사과", "복숭아", "수박", "딸기")
AlertDialog.Builder(this).run {
  setTitle("items test")
  setIcon(android.R.drawable.ic_dialog_info)
  setItems(items, object: DialogInterface.OnClickListener {
    override fun onClick(p0: DialogInterface?, p1: Int){
      Log.d("Yunseo", "선택된 과일 : ${items[p1]}")
    }
  })
  setPositiveButton("닫기", null)
  show()
}
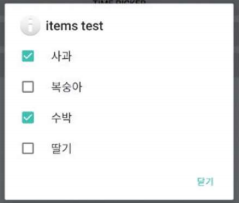
알림 다중 선택
- 다중 선택 체크박스 동시 출력
setMultiChoiceItems(items, booleanArrayOf(true, false, true, false),
object : DialogInterface.OnMultiChoiceClickListener {
  override fun onClick(dialog: DialogInterface?, which: Int, isChecked: Boolean) {
    Log.d("Yunseo", "${items[which]} 이 ${if(isChecked) " 선택되었습니다." else "선택 해제되었습니다."}")
  }
})
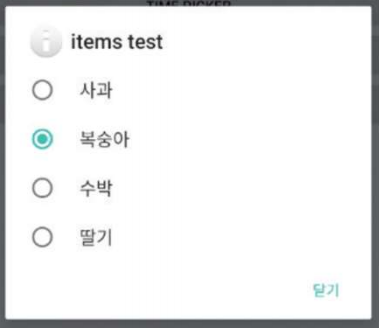
알림 단일 선택
- 단일 선택 라디오 버튼 출력
setSingleChoiceItems(items, 1, object : DialogInterface.OnClickListener{
  override fun onClick(dialog: DialogInterface?, which: Int) {
    Log.d("Yunseo", "${items[which]} 이 선택되었습니다.")
  }
})
다른 화면 탈출 허용 or 거부
| 함수 종류 | 상황 |
|---|---|
| setCancelable() | 기기의 뒤로가기 버튼을 누른 경우 |
| setCanceledOnTouchOutside() | 알림 바깥 영역을 터치한 경우 |
- 함수의 boolean값 별 행동
| bool 값 | 행동 |
|---|---|
| true | 창 닫기 |
| false | 창 닫지 않기 |
// 알림 창을 닫는 설정(뒤로가기, 바깥 영역 터치)

AlertDialog.Builder(this).run {
  setTitle("item test")
  setIcon(android.R.drawable.ic_dialog_info)
  setItems(items, object : DialogInterface.OnClickListener{
    override fun onClick(dialog: DialogInterface?, which: Int) {
      Log.d("Yunseo", "${items[which]} 이 선택되었습니다.")
    }
  })
  setCancelable(false)
  setPositiveButton("OK", eventHandler)
  setNegativeButton("Cancel", eventHandler)
  setNeutralButton("More", null)
}.show().apply{
  setCanceledOnTouchOutside(false)
}
4절. 소리와 진동 알림
소리 알림
- RingtonManager 사용
| 종류 |
|---|
| 알림(Notification) |
| 알람(Alarm) |
| 벨소리(Ringtone) |
// 소리 얻기

val notification: Uri = RingtoneManager.getDefaultUri(RingtoneManager.TYPE_NOTIFICATION)
val ringtone = RingtoneManager.getRingtone(applicationContext, notification)
ringtone.play()
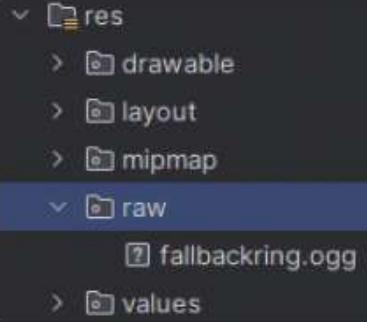
- 앱 자체 음원 준비 후 재생
- 음원 리소스 디렉토리 : res/raw
// 음원 재생

val player: MediaPlayer = MediaPlayer.create(this, R.raw.fallbackring)
player.start()
진동 알림 : VibratorManager
- AndroidManifest.xml 파일에 <uses-permission> 선언
- Vibrator 클래스의 VibratorManager 사용
- 31 버전 이후부터 VIBRATOR_MANAGER_SERVICE로 식별되는 VibratorManager 시스템 서비스 획득 후 Vibrator 이용
// 진동 객체 얻기

val vibrator = if (Build.VERSION.SDK_INT >= Build.VERSION_CODES.S){
  val vibratorManager = this.getSystemService(Context.VIBRATOR_MANAGER_SERVICE)
                        as VibratorManager
  vibratorManager.defaultVibrator
} else {
  getSystemService(VIBRATOR_SERVICE) as Vibrator
}
시간 · 패턴 지정
- API 레벨 1부터 제공
// 시간 지정 진동 설정
open fun vibrate(milliseconds: Long): Unit

// 패턴 지정 진동 설정
open fun vibrate(pattern: LongArray!, repeat: Int): Unit
진동 세기 지정
- API 레벨 26부터 제공
// VibrationEffect 객체 : 진동이 울리는 시간 외 진동 세기까지 제어
open fun vibrate(vibe: VibrationEffect!): Unit


// 진동 세기 설정
open static fun createOneShot(milliseconds: Long, amplitude: Int): VibrationEffect!
// 기본 세기 진동

if (Build.VERSION.SDK_INT >= Build.VERSION_CODES.O){
  vibrator.vibrate(
    VibrationEffect.createOneShot(500,
    VibrationEffect.DEFAULT_AMPLITUDE))
} else {
  vibrator.vibrate(500)
}
// 패턴 반복 진동

if (Build.VERSION.SDK_INT >= Build.VERSION_CODES.O){
  vibrator.vibrate(VibrationEffect.createWaveform(longArrayOf(500, 1000, 500, 2000),
  intArrayOf(0, 50, 0, 200), -1))
} else {
  vibrator.vibrate(longArrayOf(500, 1000, 500, 2000), -1)
}
5절. 알림
알림 채널
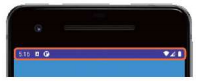
- 알림(notification) : 상태 바에 앱 정보 출력
- 앱에 알림을 위해 사용자 퍼미션(허가) 요청 필요(API 33 ~)
// Manifest 파일

<uses-permission android:name="android.permission.POST_NOTIFICATIONS"/>
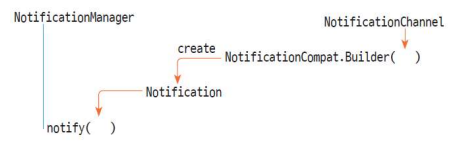
- Notification 생성 조건 : NotificationCompatBuilder
- 빌더 생성 시 NotificationChannel 생성 후 채널의 식별값을 빌더의 생성자 매개 변수로 지정 필요
- 앱의 알림을 채널로 구분
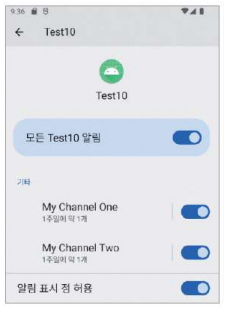
- 알림 중요도 상수
| 중요도 상수 | 설명 |
|---|---|
| NotificationManager.IMPORTANCE_HIGH | 긴급 상황 / 알림음이 울리며 헤드업 표시 |
| NotificationManager.IMPORTANCE_DEFAULT | 높은 중요도 / 알림음이 울림 |
| NotificationManager.IMPORTANCE_LOW | 중간 중요도 / 알림음이 울리지 않음 |
| NotificationManager.IMPORTANCE_MIN | 낮은 중요도 / 알림음이 없고 상태 바에 표시 X |
| 알림 채널 사용 함수 종류(fun) | 설명 |
|---|---|
| setDescription(description: String!): Unit | 채널 설명 문자열 |
| setShowBadge(showBadge: Boolean): Unit | 홈 화면 아이콘에 배지 아이콘 출력 여부 |
| setSound(sound: Uri!, audioAttributes: AudioAttributes!): Unit | 알림음 재생 |
| enableLights(lights: Boolean): Unit | 불빛 표시 여부 |
| setLightColor(argb: Int): Unit | 불빛이 표시된다면 불빛의 색상 |
| enableVibration(vibration: Boolean): Unit | 진동 여부 |
| setVibrationPattern(vibrationPattern: LongArray!): Unit | 진동을 울린다면 진동의 패턴 설정 |
// 알림 빌더

val manager = getSystemService(NOTIFICATION_SERVICE) as NotificationManager
val builder: NotificationCompat.Builder

if(Build.VERSION.SDK_INT >= Build.VERSION_CODES.O) {
  val channelId = "one-channel"
  val channelName = "My Channel One"
  val channel = NotificationChannel(
    channelId, channelName, NotificationManager.IMPORTANCE_HIGH
  )

  channel.description = "My Channel's One Descripton!"
  channel.setShowBadge(true)
  val uri: Uri = RingtoneManager.getDefaultUri(RingtoneManager.TYPE_NOTIFICATION)
  val audioAttributes = AudioAttributes.Builder()
    .setContentType(AudioAttributes.CONTENT_TYPE_SONIFICATION)
    .setUsage(AudioAttributes.USAGE_ALARM)
    .build()
  channel.setSound(uri, audioAttributes)
  channel.enableLights(true)
  channel.lightColor = Color.RED
  channel.enableVibration(true)
  channel.vibrationPattern = longArrayOf(100, 200, 100, 200)

  // 채널을 NotificationManager에 등록
  manager.createNotificationChannel(channel)

  // 채널을 이용해 빌더 생성

  builder = NotificationCompat.Builder(this, channelId)
} else {
  builder = NotificationCompat.Builder(this)
}
알림 객체
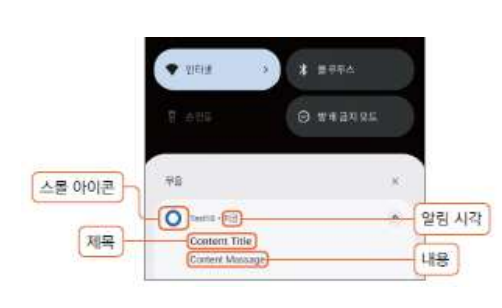
// 알림 객체 설정

builder.setSmallIcon(android.R.drawable.ic_notification_overlay)
builder.setWhen(System.currentTimeMillis())
builder.setContentTitle("Content Title")
builder.setContentText("Content Message")
// 알림 발생

manager.notify(11, builder.build())
// 알림 취소

manager.cancel(11)
// 알림 취소 막기

builder.setAutoCancel(false)
builder.setOngoing(true)
알림 구성
- 알림 터치 이벤트
- 인텐트 준비 후 Notification 객체에 담아 이벤트 발생 시 시스템에 요청
- 인텐트(Intent) : 액티비티가 있을 경우
// 액티비티 실행 정보 등록
static fun getActivity(context: Context!, requestCode: Int, intent: Intent!, flags: Int): PendingIntent!

// 액션 실행 정보 등록
static fun getBroadcast(context: Context!, requestCode: Int, intent: Intent!, flags: Int): PendingIntent!

// 서비스 실행 정보 등록
static fun getService(context: Context!, requestCode: Int, intent: Intent, flags: Int): PendingIntent!
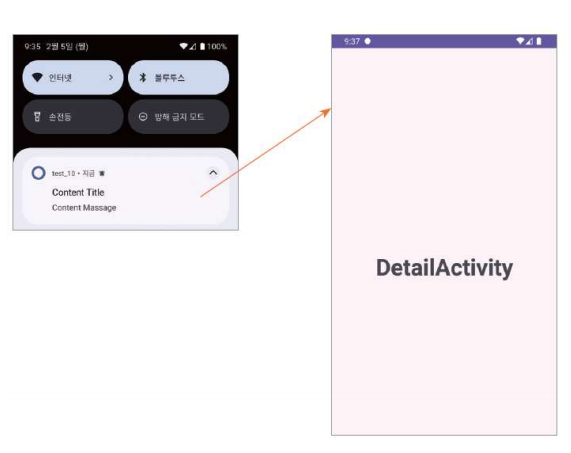
// 액티비티 실행 정보 등록 예제

// DetailActivity 클래스 파일 MainActivity가 있는 폴더에 생성
val intent = Intent(this, DetailActivity::class.java)
val pendingIntent = PendingIntent.getActivity(this, 10, intent, PendingIntent.FLAG_IMMUTABLE)

// 터치 이벤트 등록
builder.setContentIntent(pendingIntent)
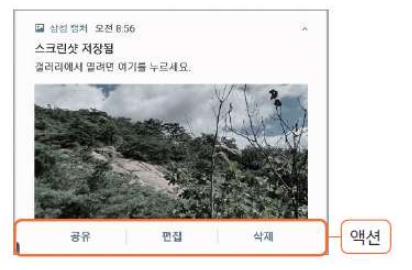
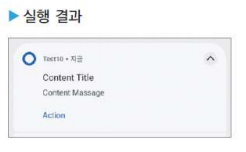
액션
- 최대 3개 추가
// 액션 등록

// DetailActivity가 아닌 OneReceiver 클래스 생성
val actionIntent = Intent(this, OneReceiver::class.java)

val actionPendingIntent = PendingIntent.getBroadcast(this, 20, actionIntent,
  PendingIntent.FLAG_IMMUTABLE)
builder.addAction(
  NotificationCompat.Action.Builder(
      android.R.drawable.stat_notify_more,
      "Action",
      actionPendingIntent
  ).build()
)
원격 입력
- 알림에서 사용자 입력을 직접 받는 기법
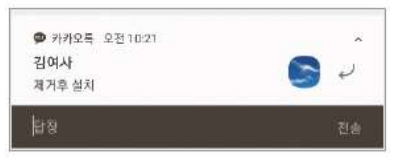
// 원격 입력

val KEY_TEXT_REPLY = "key_text_reply"
var replyLabel: String = "답장"
var remoteInput: RemoteInput = RemoteInput.Builder(KEY_TEXT_REPLY).run{
  setLabel(replyLabel)
  build()
}
- PendingIntent 준비
// 인텐트 준비

val replyIntent = Intent(this, ReplyReceiver::class.java)
val replyPendingIntent = PendingIntent.getBroadcast(this, 30, replyIntent, PendingIntent.FLAG_MUTABLE)
알림에 액션 등록
// 원격 입력 액션 등록

builder.addAction(
  NotificationCompat.Action.Builder(
    R.drawable.send,
    "답장",
    replyPendingIntent
  ).addRemoteInput(remoteInput).build()
)
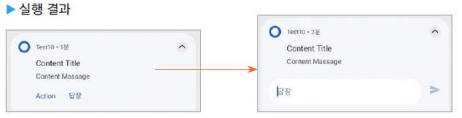
사용자가 입력한 글 반환 코드
// 브로드캐스트 리시버에서 사용자가 입력한 글을 받는 코드

val replyTxt = RemoteInput.getResultsFromIntent(intent)
  ?.getCharSequence("key_text_reply")
프로그레스
- 진행 상황 실시간 공유
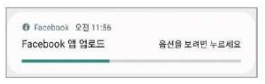
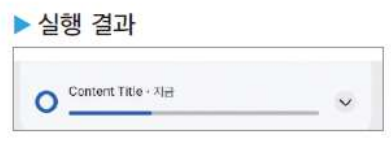
// 프로그래스 바 진행값 증가 스레드

builder.setProgress(100, 0, false)
manager.notify(11, builder.build())

thread{
  for(i in 1..100) {
    builder.setProgress(100, i, false)
    manager.notify(11, builder.build())
    SystemClock.sleep(100)
  }
}
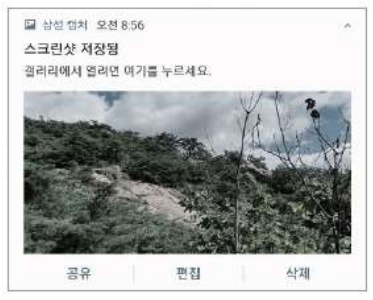
큰 이미지 스타일
// 큰 이미지 스타일

val bigPicture = BitmapFactory.decodeResource(resources, R.drawable.test)
val bigStyle = NotificationCompat.BigPictureStyle()
bigStyle.bigPicture(bigPicture)
builder.setStyle(bigStyle)
긴 텍스트 스타일
// 긴 텍스트 스타일

val longTextStyle = NotificationCompat.BigTextStyle()
longTextStyle.bigText(resources.getString(R.string.long_text))
builder.setStyle(longTextStyle)
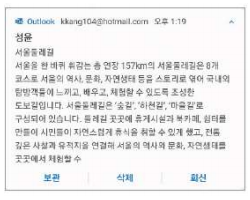
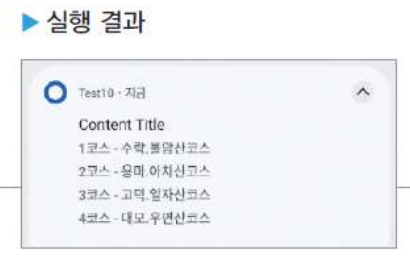
상자 스타일
// 상자 스타일

val style = NotificationCompat.InboxStyle()
style.addLine("1코스 - 수락.불암산코스")
style.addLine("2코스 - 용마.아차산코스")
style.addLine("3코스 - 고덕.일자산코스")
style.addLine("4코스 - 대모.우면산코스")
builder.setStyle(style)
메세지 스타일
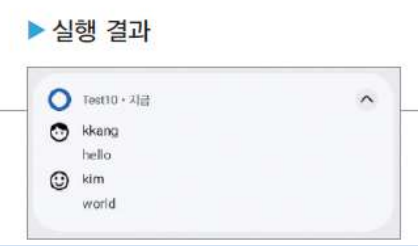
- Person : 알림에 출력될 한 사람의 정보를 담는 클래스
// Person 객체 생성

val sender1: Person = Person.Builder()
  .setName("kkang")
  .setIcon(IconCompat.createWithResource(this, R.drawable.person1))
  .build()

val sender2: Person = Person.Builder()
  .setName("kim")
  .setIcon(IconCompat.createWithResource(this, R.drawable.person2))
  .build()
// 메세지 객체 생성

val message1 = NotificationCompat.MessagingStyle.Message(
  "hello",
  System.currentTimeMillis(),
  sender1
)

val message2 = NotificationCompat.MessagingStyle.Message(
  "world",
  System.currentTimeMillis(),
  sender2
)
// 메세지 스타일 생성

val messageStyle = NotificationCompat.MessagingStyle(sender1)
  .addMessage(message1)
  .addMessage(message2)
builder.setStyle(messageStyle)
6절. 카카오톡 알림
1) 새 모듈 생성 & 그래들 설정
- Ch10_Notification 새 모듈 생성
- 뷰 바인딩 기법 추가
viewBinding.isEnabled = true
2) 파일 복사
- drawable 디렉토리 : big.jpg, small.png, send.png 파일
- res/layout 디렉토리 : layout/activity_main.xml 파일 작성
1
2
3
4
5
6
7
8
9
10
11
12
13
14
15
16
<!-- activity_main.xml 파일 -->

<?xml version="1.0" encoding="utf-8"?>
<LinearLayout xmlns:android="http://schemas.android.com/apk/res/android"
    android:layout_width="match_parent"
    android:layout_height="match_parent"
    android:orientation="vertical"
    android:gravity="center"
    android:id="@+id/main">

    <Button
        android:id="@+id/notificationButton"
        android:layout_width="wrap_content"
        android:layout_height="wrap_content"
        android:text="알림 발생"/>
</LinearLayout>
3) 퍼미션 선언
1
2
3
<!-- AndroidManifest.xml 파일에 추가한 퍼미션 -->

<uses-permission android:name="android.permission.POST_NOTIFICATIONS"/>
4) 브로드캐스트 리시버 작성
// ReplyReceiver.kt 파일

class ReplyReceiver : BroadcastReceiver() {
    override fun onReceive(context: Context, intent: Intent) {
        val replyTxt = RemoteInput.getResultsFromIntent(intent)?.getCharSequence("key_text_reply")
        Log.d("Yunseo", "replyText : $replyTxt")
        val manager = context.getSystemService(AppCompatActivity.NOTIFICATION_SERVICE)
            as NotificationManager
        manager.cancel(11)
    }
}
5) 메인 액티비티 작성
// MainActivity.kt 파일

class MainActivity : AppCompatActivity() {
    override fun onCreate(savedInstanceState: Bundle?) {
        super.onCreate(savedInstanceState)

        val binding = ActivityMainBinding.inflate(layoutInflater)
        setContentView(binding.root)

        val permissionLauncher = registerForActivityResult(
            ActivityResultContracts.RequestMultiplePermissions()
        ){
            if(it.all { permission -> permission.value == true}){
                noti()
            } else {
                Toast.makeText(this, "permission 거부!", Toast.LENGTH_SHORT).show()
            }
        }

        binding.notificationButton.setOnClickListener {
            if(Build.VERSION.SDK_INT >= Build.VERSION_CODES.TIRAMISU){
                if(ContextCompat.checkSelfPermission(
                    this,
                    "android.permission.POST_NOTIFICATIONS"
                ) == PackageManager.PERMISSION_GRANTED){
                    noti()
                } else {
                    permissionLauncher.launch(arrayOf("android.permission.POST_NOTIFICATIONS"))
                }
            } else {
                noti()
            }
        }
    }

    fun noti(){
        val manager = getSystemService(NOTIFICATION_SERVICE) as NotificationManager
        val builder: NotificationCompat.Builder
        if(Build.VERSION.SDK_INT >= Build.VERSION_CODES.O){
            val channelId = "one-channel"
            val channelName = "My Channel One"
            val channel = NotificationChannel(channelId, channelName, NotificationManager.IMPORTANCE_DEFAULT)
                .apply {
                    description = "My Channel One Description"
                    setShowBadge(true)
                    val uri : Uri = RingtoneManager.getDefaultUri(RingtoneManager.TYPE_NOTIFICATION)
                    val audioAttributes = AudioAttributes.Builder()
                        .setContentType(AudioAttributes.CONTENT_TYPE_SONIFICATION)
                        .setUsage(AudioAttributes.USAGE_ALARM)
                        .build()
                    setSound(uri, audioAttributes)
                    enableVibration(true)
                }
            manager.createNotificationChannel(channel)
            builder = NotificationCompat.Builder(this, channelId)
        } else {
            builder = NotificationCompat.Builder(this)
        }

        builder.run {
            setSmallIcon(R.drawable.small)
            setWhen(System.currentTimeMillis())
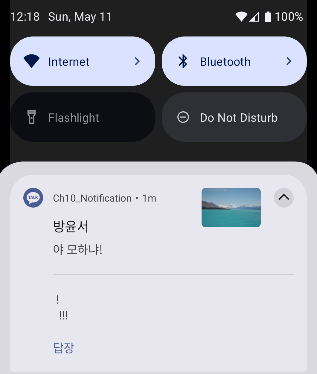
            setContentTitle("방윤서")
            setContentText("야 모하냐!")
            setLargeIcon(BitmapFactory.decodeResource(resources, R.drawable.big))
        }

        val KEY_TEXT_REPLY = "key_text_reply"
        var replyLabel = "답장"
        val remoteInput: RemoteInput = RemoteInput.Builder(KEY_TEXT_REPLY).run {
            setLabel(replyLabel)
            build()
        }

        val replyIntent = Intent(this, ReplyReceiver::class.java)
        val replyPendingIntent = PendingIntent.getBroadcast(
            this, 30, replyIntent, PendingIntent.FLAG_MUTABLE
        )

        builder.addAction(
            NotificationCompat.Action.Builder(
                R.drawable.send, "답장", replyPendingIntent
            ).addRemoteInput(remoteInput).build()
        )

        manager.notify(11, builder.build())
    }
}
6) 앱 실행
This post is licensed under CC BY 4.0 by the author.